NDDNUG and Minecraft Command Blocks
Wednesday night we once again had kid’s night with a focus on Minecraft at The North Dallas .NET User Group monthly meeting. This blog post is for those who attended so they have some notes on what we covered. If you didn’t come, maybe you will find it useful too.
During the meeting we focused on commands and command blocks. Here is what we covered in roughly the same order as Wednesday.
Coordinates and Block Names
For the things that follow, it will be very helpful to know how to get coordinates and to know how to get the names of blocks. While in the game, hit the F3 key (for those with a “function” or “fn” key, you may need to hold that down as well as you hit the F3 key). Your screen should have a bunch of new information on it (you can dismiss this info by hitting F3 again).
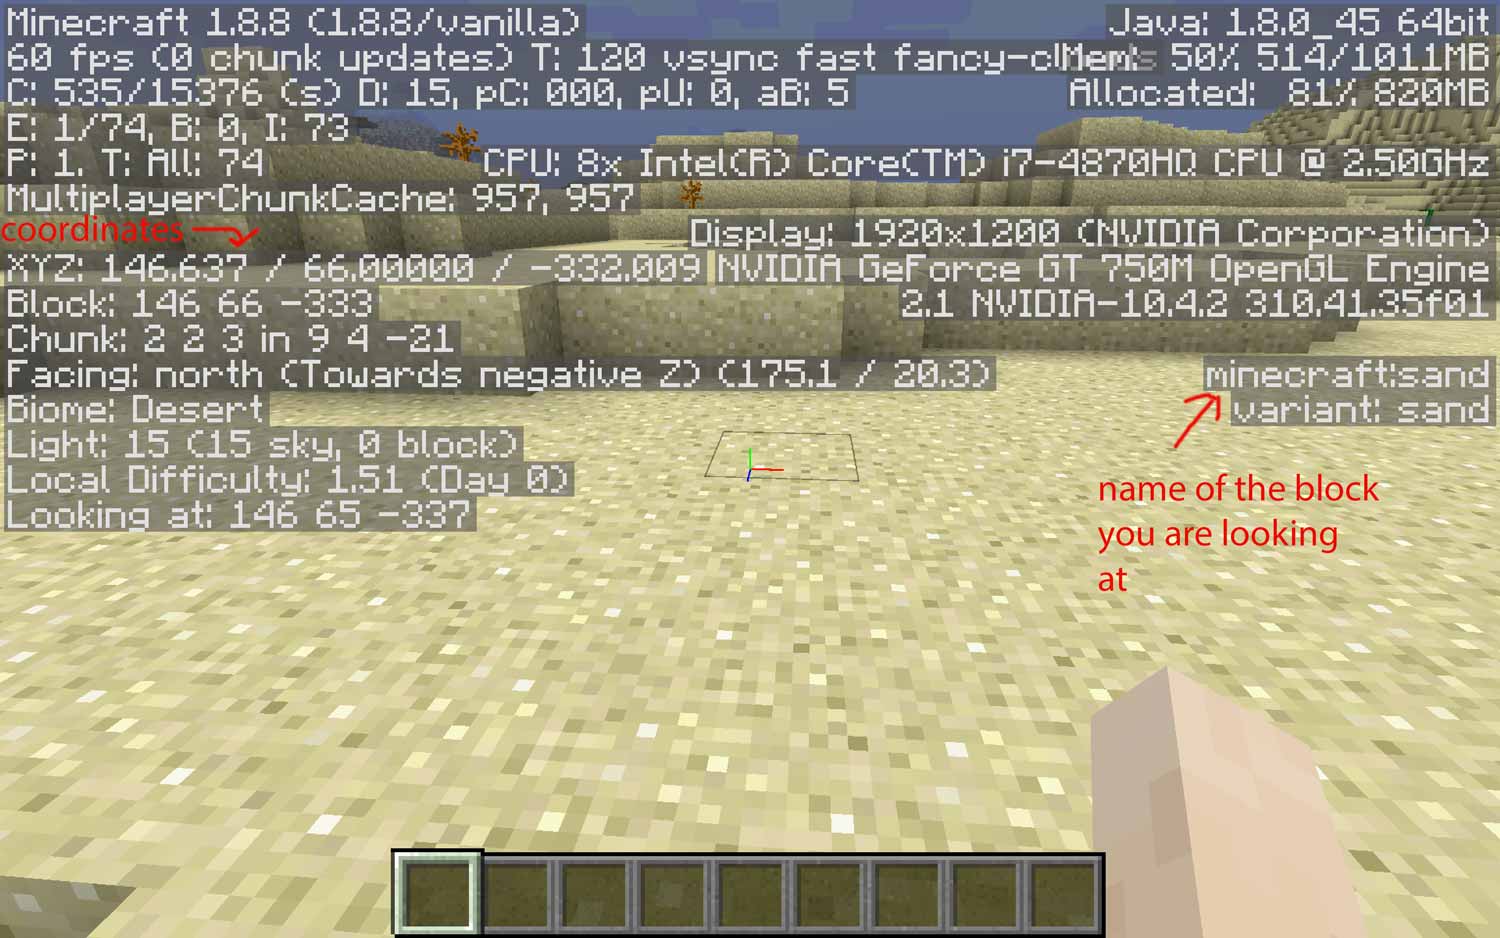
The first thing you need to know how to find is your coordinates. You should see XYZ: followed by some numbers and slashes. These are your coordinates and mine on are the left. In the screenshot above, my coordinates read XYZ: 146.637 / 66.000000 / –332.009. Anything on the map can be located by a set of coordinates. The first coordinate is the X coordinate, the second the Y coordinate and the third the Z coordinate. In this case my X coordinate is 146 (it is okay to round the numbers), my Y is 66 and my Z is –332.
The X and Z coordinates, the first and the third, tell you where the player is horizontally. As a player goes east, his X coordinate increases. As he goes west, his X coordinate decreases. The Z coordinate increases as you go south and decreases as you go north. The middle coordinate, Y, increases as you go higher and decreases as you go lower. Sea level, the level of the oceans in normal maps, is at Y 62. The bottom of the bedrock is at Y 0.
So at any given point, you can know exactly where you are by looking at your coordinates and writing them down. Find a village and want to come back some day? Write the coordinates down. It takes a bit of practice but you can learn to follow the coordinates and find your way back. Or you can teleport (see below).
Before we get to the actual commands, one more thing. You can find out the minecraft block name on the same screen as above. If you are looking at a block near you, it will show the name of the block in the place indicated on the screenshot. You’ll need this later. You can also get those values here: http://minecraft.gamepedia.com/Data_values/Block_IDs
Now that we have that covered, we can start with some nifty commands.
Give command
People who have been playing Minecraft are probably used to typing t to
open the chat box so they can chat with their friends. But not everyone knows
that you can execute commands there. Let’s start with the give command, which will
give you a block.
Create a new world with a game type of creative. When the world shows up, type / and the chat window with appear with a slash at the beginning. Type in the following:
/give @p minecraft:command_block 64
Hit enter. Unless you have all your open slots filled up in your inventory, you
should get 64 command blocks. When using the chat window, commands always start
with a slash as you see in the example above. Next is the command. In this case,
the command is give. After this command comes a number of parameters,
or pieces of info that you are giving the command so the command knows what to do.
The first piece of info is the player to be given the stuff. If you put a player’s
name instead of @p, you will give the command blocks to that player.
If you put @p, you give them to yourself. In this case, that’s what we want to do.
The next parameter is the name of the block. minecraft:command_block is the full name of a command block and you will need all of it to work. The last parameter is the number of blocks go give yourself. Let’s start with 64.
Unless you have used command blocks before, you probably haven’t seen them because they don’t show up as items in the creative inventory. That’s why you have to use the give command to get them. You can use the give command to get any type of block. Here you could use it to give yourself diamond blocks.
/give @p minecraft:diamond_block 64
Now that you have command blocks, we can move on.
Teleportation command
Minecraft has a built-in teleport command. Open up the chat window again and type the following in:
/tp @p 0 200 0
And then hit the enter key. You should teleport to the very center of the map horizontally and 200 blocks up from the bottom of the world (not the ground). Let us take that command apart to understand it.
First is the command, much like the give command above. The first
parameter is the player to teleport. In this case we want ourselves, so we
use @p. Next follows the XYZ coordinates. If you
use the ones above, as I said, you’ll teleport to the very center of the map horizontally and 200 blocks up from the bottom. If you are flying, then you’ll likely be suspended in the air. If you aren’t, you’ll start falling.
Using the teleport command can be very handy but it can get tedious to type that in every time you want to teleport. Instead of that, we’ll use one of the command blocks we got above.
To get started, place the command block somewhere. Then right-click on it. The commands you type into the the command blocks are the same ones you type in the chat window, except without the starting slash. Here is what a command block looks like when you select it:
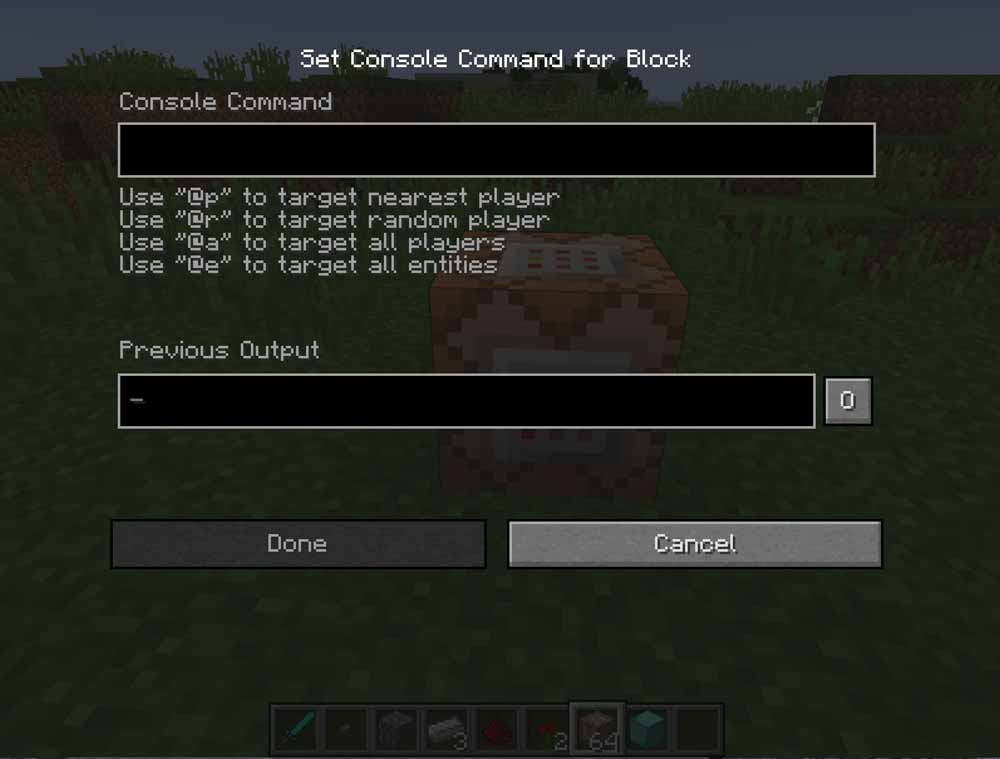
Put the teleport command (without the slash at the beginning) in that top box.
Next you need a way to trigger the command block. If you set a pressure plate either on it (hold down shift and then right-click on the top of the block) or right next to it, you can trigger the command by stepping on the plate. There are other ways to trigger command blocks (buttons, redstone, etc.) as well.
So what is a good use for this? I most often use the teleport command to make it faster to travel from one part of a map to another (obviously). If you are playing with friends, it is good way to travel to each others houses. If they aren’t close, walking or flying can take to long. Teleport to get there instantly! To do that, write down the coordinates that you want to teleport to at each location and create command blocks to send you back and forth.
Note: make sure you don’t put a command block and pressure plate right where someone is teleporting. They may trigger it right when they arrive and teleport back to where they started!
Relative Positioning
Sometimes it is handy to use relative coordinates instead of exact coordinates.
Here’s what I mean. Let’s say you are at the XYZ coordinates of
100 80 100. If you want to teleport yourself up 100 blocks,
you could do the math and execute a teleport command to move you up those
100 blocks. Or you could avoid the math and use relative coordinates.
This is what it would look like:
tp @p ~ ~100 ~
This command still uses three coordinates as before. But instead of using the
exact coordinates, you use a tilde (that squiggly line). So the above command
teleports the current player to the X position he is currently
at, the Y position where he is currently at plus 100 more,
and the Z position where he is currently at. You can also use
negative numbers.
tp @p ~ ~-40 ~
That command will send the player to the same X coordinate, a Y coordinate 40 below his current location and the same Z coordinate. You can also change all three.
tp @p ~5 ~10 ~-5
That command will send the player to five X spaces higher than he currently is, 10 Z spaces above where he is and minus five Z spaces relative to where he currently is.
Maybe this will be useful for you in teleporting. It can definitely be useful to you when filling.
The Fill Command
Now it is time to use the fill command. All the commands below will assume that I am facing east. The direction you are facing is specified under the coordinates when you hit F3.
The fill command takes two sets of coordinates, giving you six numbers total and the name of a block. It will fill in the are defined by the changes in coordinates. A few examples will help. If you find this confusing, it might be best to have your parents work with you on the math related to this. Here is our first example.
/fill ~1 ~ ~ ~20 ~ ~ minecraft:cobblestone
This starts with the fill command. The first three numbers and/or tilde marks are the starting coordinate of the fill. The second set of three numbers and/or tilde marks are the ending coordinates for the fill.
As we said above, we are facing east in these examples. As you head east,
the X coordinate increases. So I am starting the fill one
block east of where I am currently (floating in the air in the screenshot below)
but at my current Y and Z location. The next
set of coordinates is the destination, which is twenty larger X
than my current location with the same Y and Z once
again. Here’s what it looks like.
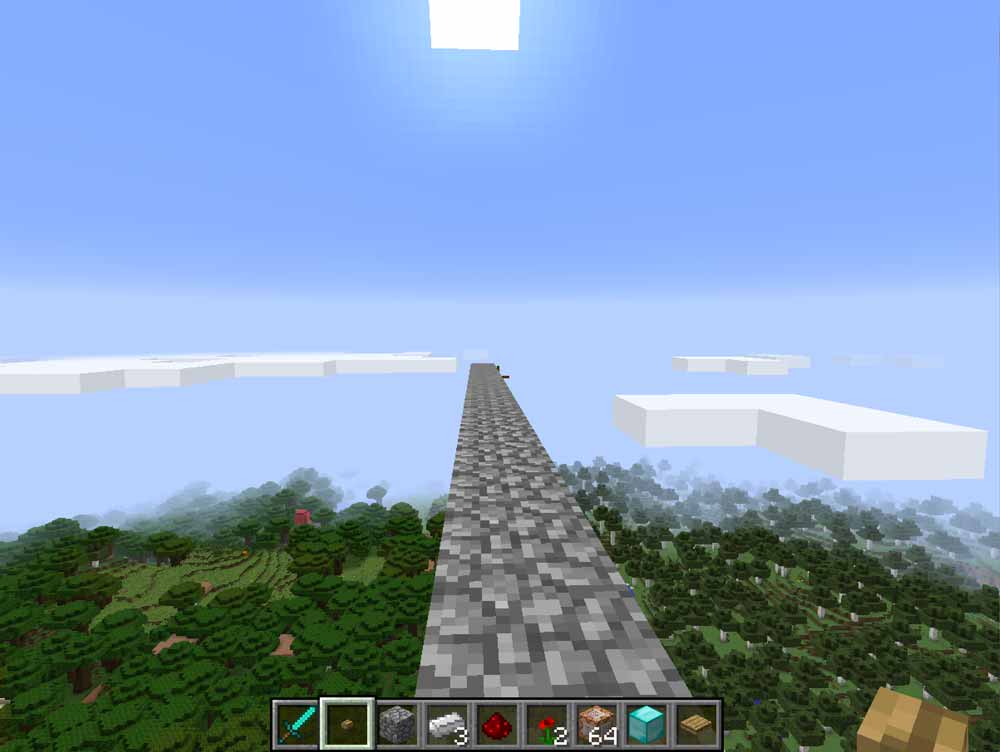
So if you use the fill command and change only one of the values in the coordinates between the first and second sets, you get a line. Here’s another example.
/fill ~1 ~ ~ ~20 ~ ~5 minecraft:cobblestone
If you change two of the coordinates, you get a rectangle. Since I changed X and Z, I get a horizontal rectangle. To get a vertical rectangle, change the Y instead.

So what do you get if you change all three coordinates?
/fill ~1 ~ ~ ~20 ~5 ~5 minecraft:cobblestone
A cube!
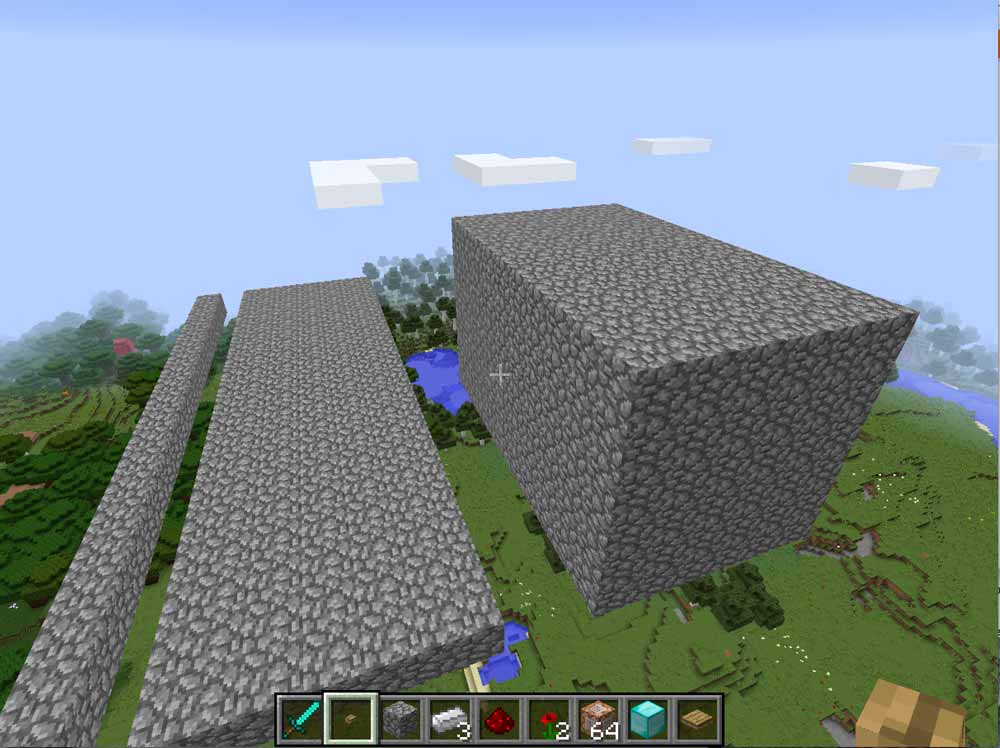
Imagine you want to build something in the sky and you need to create a platform for yourself. The second or third fills above would be a great place to start. Or how about you’re on the ground in a flat place and you want a quick wall. This would get you started.
/fill ~1 ~ ~ ~50 ~4 ~3 minecraft:cobblestone
Ta-da! This will give you a wall fifty blocks long, five tall and four wide. It’s not four tall and three wide because the relative coordinates include the starting coordinate and then the additions or subtractions, so the second two coordinates ~4 and ~3 get you five high and four thick.
Make a Hole
You can use this same filling technique to remove blocks as well. If you want to create a very large hole, you could do something like the following:
/fill ~1 ~ ~ ~30 ~-50 ~15 minecraft:air
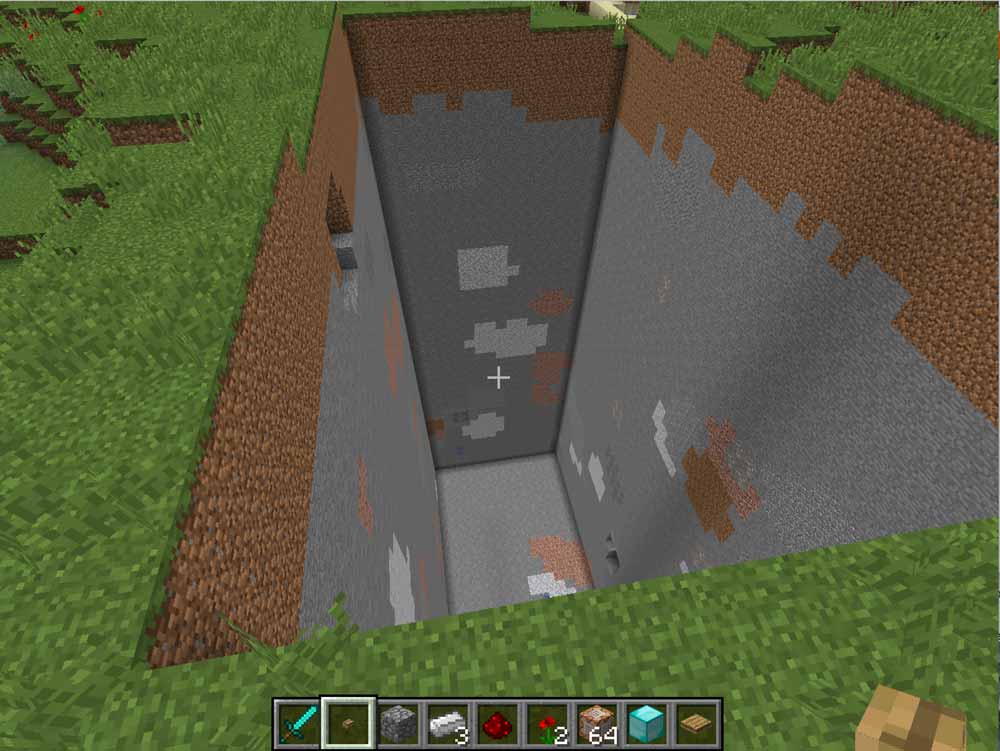
Or imagine if you wanted to create a long hallway underground. If you want the resources, dig up the hallway. If you don’t, you can fill the area with air.
Making an iron golem creator
Another useful idea is to make an iron golem so you can supply your villages
with protection. You make an iron golem using iron blocks in the form of
a t with a pumpkin on top. You can do that manually…or you can
use command blocks! This one is a bit more complicated but may be worth your time
(and thanks to Sean Sparkman for helping me with this one).
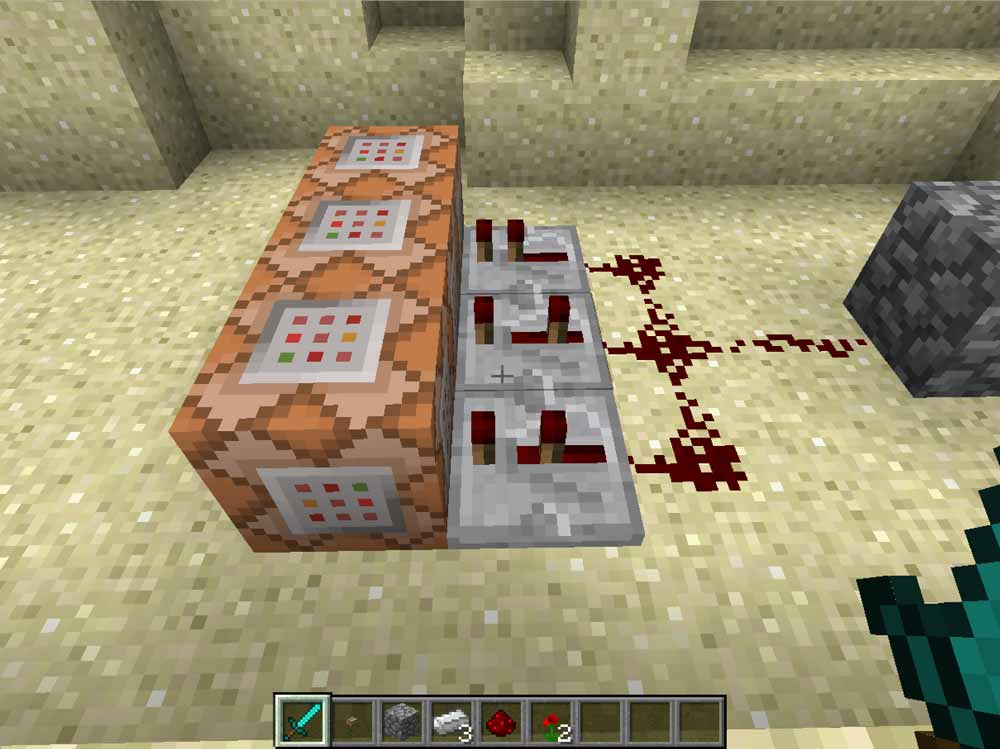
Once again facing east, arrange three command blocks side-by-side. Enter the following commands in each, one per block.
fill ~4 ~3 ~2 ~4 ~3 ~2 minecraft:pumpkin
fill ~3 ~2 ~1 ~5 ~2 ~1 minecraft:iron_block
fill ~4 ~1 ~ ~4 ~2 ~ minecraft:iron_block
Next place a redstone repeater in front of all three and set the levers in different positions. It should look something like this.
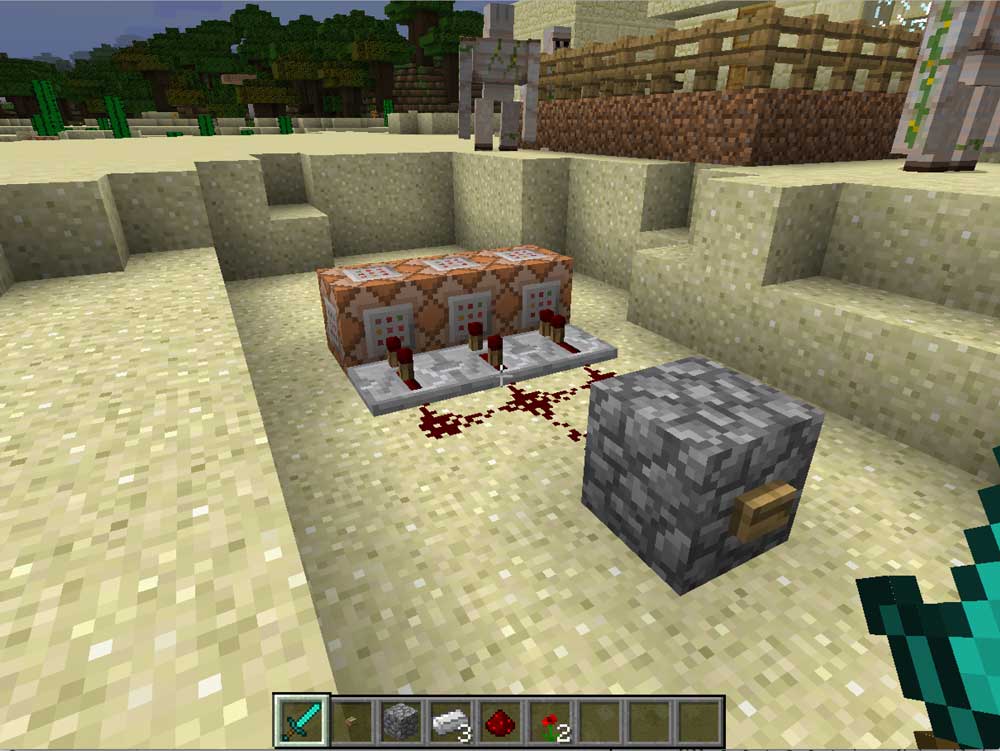
Next tie it together with redstone, lead the redstone to a block and put a button on the block. When you push the button, you should get an iron golem. Make sure there is room in front of the command blocks for the spawned golem. You don’t want them to be spawned inside of a wall or something!
Summoning entities
And finally, you can use command blocks to spawn entities like skeletons, pigs, cows, etc. Here is how you can spawn a skeleton.
/summon Skeleton ~0 ~1 ~0
For more examples, I would recommend using this web page. I found it very handy.
That’s it!
I hope you found it all useful. Happy commanding!
comments powered by Disqus